






The difference between a jewellery image that sells and one that gets scrolled past almost always comes down to lighting. A poorly lit diamond looks like a glass bead. A brilliantly lit one looks like a promise. At Ckstudio, after photographing over 10,000 pieces for Delhi NCR jewellers, D2C brands, and marketplace sellers, one truth has stayed constant across every category — lighting alone accounts for roughly 70% of image quality, long before any post-production begins.
This guide is Prince’s working playbook — the exact jewellery photography lighting setups, modifier choices, and correction moves used inside a professional studio to control reflections, coax diamond fire, and hold true gold colour. Whether you are a seller preparing your first Amazon listing or a photographer scaling into the jewellery niche, the aim is simple: give you techniques you can execute today and understand why they work.
Key Takeaways
- A three-point studio lighting setup with 60–90cm softboxes handles most jewellery scenarios cleanly.
- Diamonds need multiple small hard light sources at varied angles — softboxes alone kill sparkle.
- Gold jewellery demands accurate white balance (5200–5500K) and warm-tone protection, not stronger light.
- Reflection control is 60% of the job — black flags, bounce cards, and light tents matter more than expensive lights.
- Professional jewellery photography at Ckstudio starts at ₹4,999 with equipment, expertise and marketplace-ready delivery included.
What Is Jewellery Photography Lighting?
Jewellery photography lighting is the deliberate arrangement of light sources, modifiers, and reflection controls used to render metallic surfaces, gemstones, and intricate detail work with accurate colour, controlled highlights, and correct contrast. Unlike general product photography, jewellery involves highly reflective and refractive materials — gold mirrors everything around it, silver picks up cool tints, and diamonds only sparkle when hit by light from precisely the right angle. Standard soft-and-even lighting flattens all of it. The craft lies in balancing studio lighting shape, direction, and diffusion so metals stay clean, stones stay lively, and the piece looks the way it does in a jeweller’s hand.
According to Baymard Institute’s ecommerce UX research, image quality is consistently cited as one of the top decision drivers in online purchase behaviour — and in a category as visually driven as jewellery, that weighting rises even higher. Which is why light modifiers and reflection control deserve as much attention as camera or lens choice.
Why Professional Jewellery Photography Lighting Matters
India’s jewellery ecommerce category has moved from novelty to necessity. Buyers now expect the same tactile detail from an online listing that they get across a showroom counter. When the lighting is wrong, the image lies — a 22k necklace looks brassy, a lab-grown diamond looks cloudy, and a customer either bounces or returns the piece. When the lighting is right, the image sells before the description is even read. Professional jewellery photography lighting is the difference between an ecommerce catalogue that converts and one that eats ad spend.
Beyond conversion, marketplace algorithms lean on image quality signals. Amazon, Flipkart, and Myntra all reward listings where the primary image passes their technical thresholds — accurate white background, sharp focus, correct exposure — and quietly demote those that don’t. Every serious ecommerce jewellery brand Prince has worked with at Ckstudio has seen ranking and CTR improve after a proper studio upgrade. If you want to understand the commercial side deeper, this breakdown of how imagery affects conversions on Amazon and Flipkart lays out the numbers Ckstudio’s team tracks internally.
Impact on Ecommerce Conversions (Amazon, Flipkart, Myntra)
Each platform enforces its own imaging spec, but they share one bias — well-lit, high-clarity images rank higher. Amazon’s A9 relevance system uses image quality as a soft-ranking signal, and its main image must sit on pure white (RGB 255,255,255) with the product occupying at least 85% of the frame. Flipkart’s seller hub asks for shadowless white backgrounds and true-colour reproduction. Myntra, which leans editorial, penalises listings where lighting flattens fabric texture or metal detail. A poor ecommerce jewellery photography workflow bleeds returns quietly — Myntra’s category-level return rate for jewellery hovers well above the platform average, and colour mismatch tops the reason list. Prince’s team at Ckstudio ships every jewellery deliverable pre-formatted for each marketplace’s spec, so listings pass moderation on the first upload. Newer sellers benefit from reading the platform-specific rulebooks — the full Amazon photography guide and Flipkart’s 2026 photography guidelines walkthrough both cover the fine print sellers keep missing.
How Lighting Affects Diamond Sparkle and Gold Shine
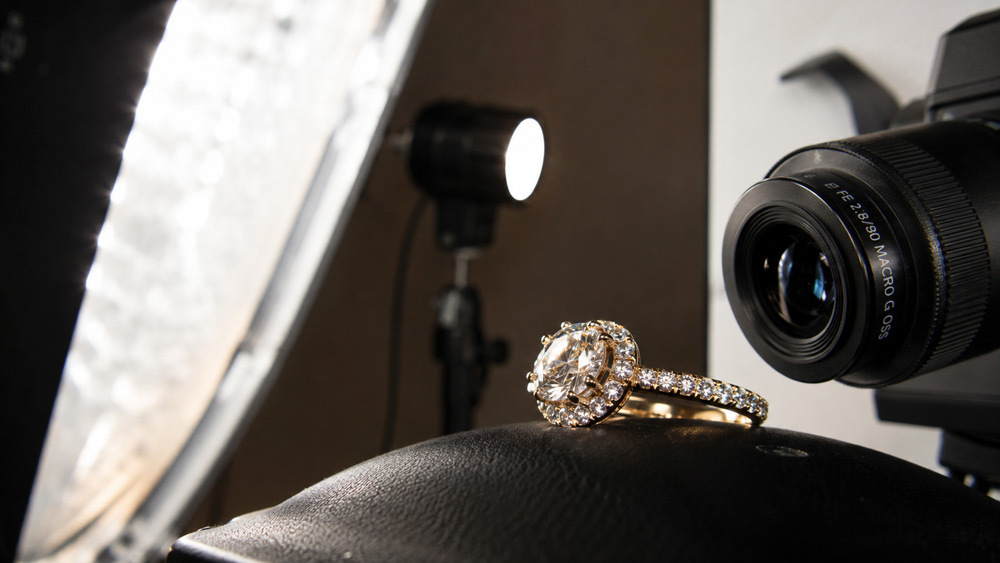
Diamonds sparkle because of refraction — a diamond has a refractive index of 2.42 versus roughly 1.5 for glass, so light bends inside it at extreme angles and exits as spectral fire, static brilliance, and moving scintillation. That trio only becomes visible when your studio lighting gives the stone something to work with. Big single softboxes give diamonds nothing to bounce — they look dull, milky, lifeless. Multiple small hard sources at varied angles wake them up. Gold behaves differently: it acts like a curved mirror, reflecting whatever surrounds it. If your studio walls, ceiling, or clothing get picked up, they contaminate the metal’s colour. This is exactly what the Gemological Institute of America (GIA) documents in its lighting research — lighting geometry, not intensity, determines what a stone looks like on camera.
Essential Equipment for Jewellery Photography Lighting Setup
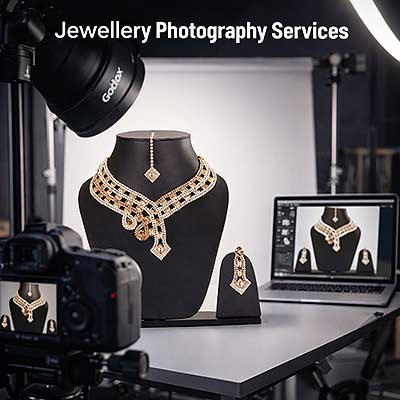
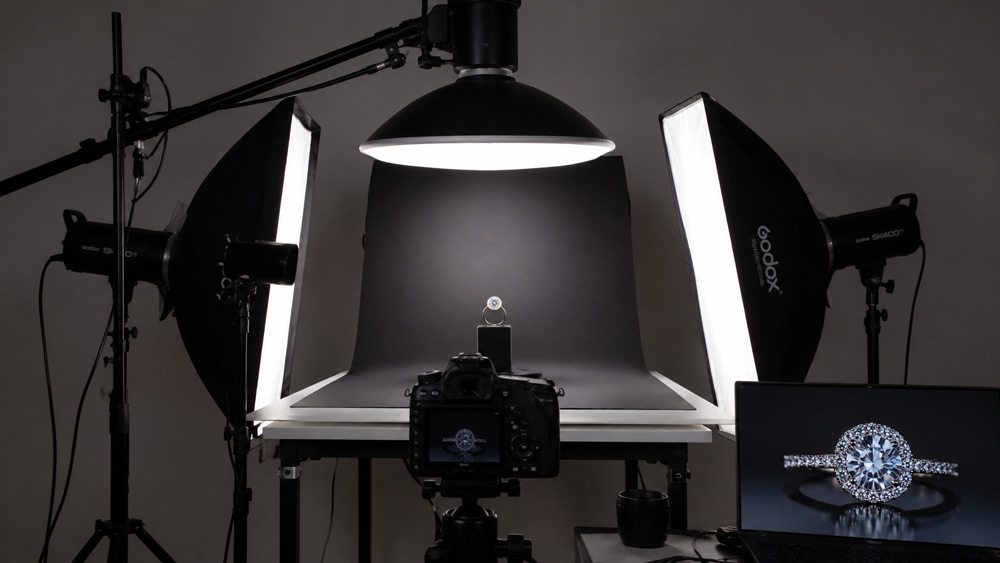
Every jewellery photography lighting setup is built from four functional groups — a light source (continuous LED or strobe), a modifier (softbox, umbrella, or grid), a controller (flag, bounce, or diffusion panel), and a shooting surface (table with seamless or tent). Everything else is refinement. At Ckstudio, the working core is four Godox SK 400II heads and two Elinchrom FRX 400 units, paired with strip softboxes, an octabox, and a beauty dish for softer fashion or model-plus-jewellery hybrid shoots. Cameras run mostly Canon R10 and Sony A7R V bodies, with a 100mm macro carrying the load for close work.
For most Indian sellers starting out, an entry setup lives between ₹50,000 and ₹1,20,000 — one main strobe or LED, one fill, a softbox, a small light tent, bounce cards, and a decent macro lens. A full editorial-grade setup can run past ₹5,00,000. If the maths doesn’t work yet, hiring a studio is often cheaper for the first two years — this current Delhi pricing breakdown and the Mumbai equivalent give a realistic sense of what the professional route costs.
Continuous LED Lights vs Studio Strobes
The LED-vs-strobe debate is genuinely open, and the honest answer is: it depends on the piece. Continuous LEDs let you see the result before you shoot, which shortens the learning curve massively — for jewellery beginners and video work, they are the friendlier tool. Strobes, however, deliver crisper specular highlights, freeze micro-vibration on delicate chains, and hold consistent colour temperature across long shoot days. For diamonds specifically, strobes almost always win because their short flash duration produces the tight star-point highlights that sparkle depends on. LEDs shine (literally) for gold, silver, and pearl work where soft even light is the goal. Prince’s rule at Ckstudio: strobes for stones, LEDs for smooth metals and video, both together when a shoot spans both.
Softboxes, Umbrellas & Light Modifiers
Modifier choice is where jewellery lighting either lifts off or collapses. A 60cm softbox at 60cm distance produces markedly different results from a 90cm softbox at 90cm — the second wraps light more gently around curves, the first has more directional bite. Umbrellas are cheaper but leak light in every direction, which is a problem in a room full of reflective surfaces you don’t want to record on gold. Shoot-through white panels and grids on octaboxes give you the level of control jewellery needs. For pieces with heavy engraving, a smaller directional modifier from a raking angle exposes detail that big diffused sources hide. Understanding this is exactly why choosing the right shooting environment is as important as choosing the right light.
Reflectors, Diffusers & Bounce Cards
Reflectors and bounce cards are the unglamorous heroes of reflective product photography. A white A4 card placed opposite the key light fills shadow in the darker facets of a diamond. A silver card kicks a sharper highlight into the edge of a ring band. A black card blocks unwanted glow and deepens contrast against a light background. Diffusion panels — usually 60x90cm frames with 1-stop or 2-stop silk — sit between the light and the piece to smooth harsh sources into workable soft light. These accessories cost a fraction of a strobe head but shape the final image more than the light itself.
Light Tents and Shooting Tables
Light tents are polarising in professional circles — some photographers swear by them, others avoid them entirely. For fast-turnaround ecommerce jewellery photography, especially for silver, pearl, and mid-range gold pieces, a light tent gives you shadowless, reflection-free results at speed. A dedicated shooting table with a smooth acrylic surface, a curved seamless white background, and clean edges is the other essential — most professional jewellery studios build a fixed shooting station and never move it.
10 Studio Lighting Techniques for Jewellery Photography
These are the ten jewellery photography lighting techniques Ckstudio’s team rotates through depending on the piece, the platform, and the client brief. Some are foundational, some are situational, and a few are quiet fixers for problems no beginner sees coming. Each is described the way it actually gets executed on the studio floor, not the way textbooks describe it.
Technique 1 — Three-Point Lighting Setup
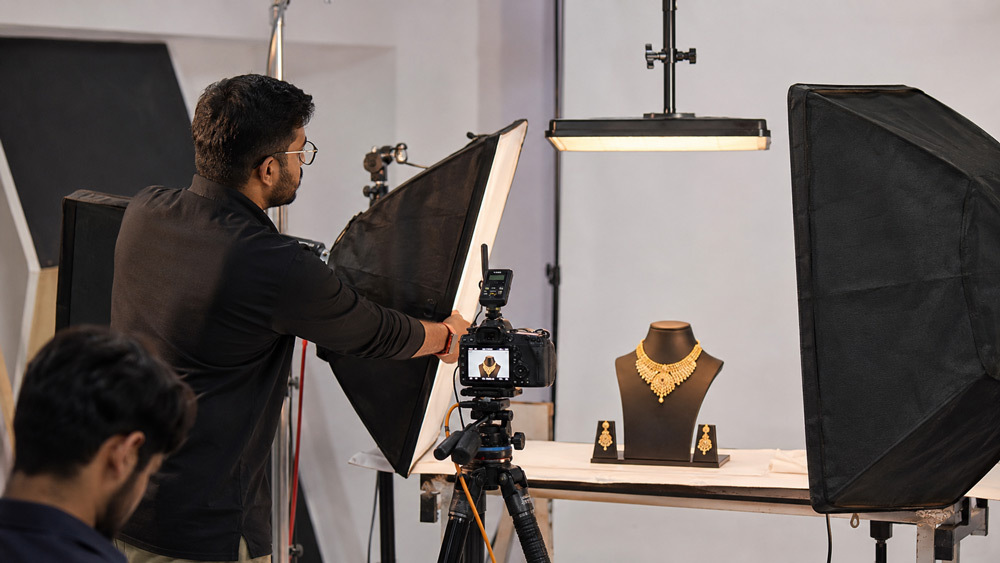
The three-point setup is the foundation of every professional jewellery shot at Ckstudio. A key light — usually a 60cm softbox — sits at 45 degrees from the camera axis at roughly the same height as the piece. A fill light softbox, dialled down to one-quarter to one-half the key’s power, sits on the opposite side to open the shadows without erasing them. A back rim light — either a small strip softbox or a bare strobe with a grid — placed behind and above the piece rakes light across the edges to separate the jewellery from the background. This alone will handle 70% of your ecommerce work. Distances matter: 60–90cm from piece to key for most rings and pendants, 90–120cm for necklaces that need broader coverage. Power ratios matter more than absolute power — a 400Ws strobe at 1/16 power reads similarly to a 200Ws strobe at 1/8, so learn to think in stops, not watts.
Technique 2 — Softbox Diffusion for Even Illumination
When the goal is a clean, product-focused ecommerce shot with no drama, oversized softbox diffusion is the answer. A large octabox or a 120cm strip box wrapped in an extra silk delivers light so soft that reflections on metal surfaces read as gradients rather than harsh hotspots. This is the workhorse setup for Amazon and Flipkart primary images — the customer sees the shape and colour clearly, without competing highlights. The tradeoff is life: pieces can look slightly flat, so pair this with a subtle rim light or a small back-hair light to add dimension.
Need a Studio That Already Knows These Setups?
Ckstudio has been shooting jewellery for Delhi NCR sellers since 2015. Talk to Prince about your catalogue.
Technique 3 — Diamond Photography Lighting for Sparkle & Fire
Diamonds are the hardest subject in the entire jewellery catalogue. A diamond only shows fire when hit by directional light at the angles its facets are cut to bend — feed it soft flat light and it looks like a plastic bead. The Ckstudio setup for premium diamond photography lighting uses three or four small hard sources instead of one big softbox: two speedlights with reflectors at 30 and 60 degrees, a raking back light, and a small hair light aimed just at the stone. Behind the diamond, a black velvet or matte acrylic surface deepens contrast so the specular highlights read as bright pinpoints rather than washed-out spots. Camera settings: 100mm macro lens, aperture f/8 to f/11, ISO 100, and either a single frame or focus-stacked series when the ring has depth. GIA’s grading laboratory uses standardised D65 lighting for exactly this reason — controlled geometry beats power every time. For an ideal-cut round brilliant, the hearts-and-arrows optical pattern only reveals itself under this kind of multi-source symmetrical light. Get this right and even a modest 0.5-carat solitaire looks like the front-page piece of a boutique.
Technique 4 — Gold Jewellery Photography Lighting
Gold jewellery photography is entirely a white-balance and reflection game. Yellow gold at 22k reads warm even under neutral daylight-balanced strobes at 5500K; push the WB warmer and it goes orange, cool it down and it turns green. The right target is 5200–5500K with a subtle warm tilt in post, never a strong one. Rose gold pieces need the opposite treatment — a hair cooler on WB — because the copper alloy already brings warmth into the tone. The real trap: gold reflects the studio. A brown ceiling reads brown in the metal, a black flag reads as a dark line across the band, a stray white shirt reads as a hot streak. At Ckstudio, gold shoots happen in a fully controlled bay with matte white surroundings, black flags only where deliberately placed, and photographer wearing neutral dark clothing. India’s gold retail market runs into tens of billions of dollars annually — for the sellers in Karol Bagh, Chandni Chowk, and Zaveri Bazar we photograph regularly, this reflection discipline is what separates a listing photo from a showroom image.
Technique 5 — Silver & Platinum Reflective Lighting
Silver and platinum bring their own challenges — both are more mirror-like than gold and pick up ambient colour aggressively. Silver in particular can look grey and lifeless if lit too flatly. The Ckstudio approach uses cooler-biased WB (5600–5800K), tighter modifier control to keep reflections clean, and a slight rim light to reintroduce edge definition. Platinum reads slightly cooler and denser than silver — resist the urge to over-brighten, since the material’s premium look depends on its restrained tone. This is reflective product photography in its purest form: you are essentially deciding what the piece reflects, then shaping only that.
Technique 6 — Light Tent Setup for Reflection-Free Shots
For high-volume catalogue work — think 100+ silver earrings for a Meesho or Flipkart seller — a well-sized light tent is the fastest, most consistent route. Two continuous LED panels outside the tent, product inside on a small acrylic riser, camera lens poked through the front aperture. Result: even light on all sides, minimal reflection, backgrounds that need almost no cleanup. It is not the technique for editorial diamond hero shots, but for volume ecommerce jewellery photography where consistency across a range matters more than drama, it earns its place.
Technique 7 — Backlight and Rim Light for Depth
A back or rim light turns a flat catalogue image into something with dimension. On a pendant, a small strip softbox behind and above brings out the edge glow that separates the piece from the background. On a bangle, a raking light from the far side traces the outline. This is what gives Ckstudio’s premium editorial jewellery work its magazine feel — the piece looks like it has volume and weight, not like it was pasted onto white. Use these lights subtly; the moment they announce themselves, the image looks amateur.
Technique 8 — Polarized Lighting to Kill Hot Spots
Cross-polarisation is the professional’s secret weapon against reflective hotspots. A linear polariser gel over each light, and a circular polariser on the lens, cancels out the specular reflections that ruin gold and silver work. Rotate the lens polariser and the hotspots literally disappear before your eyes. The tradeoff — you lose about 1.5 to 2 stops of light, so you’ll need to push power or open aperture. For pieces with heavy engraving, gemstone-inlaid metalwork, or highly polished surfaces that must not glare, cross-polarisation delivers what no modifier alone can.
Technique 9 — Focus Stacking with Consistent Lighting
Jewellery is a macro subject. At f/8 on a 100mm macro lens close to the piece, depth of field is measured in millimetres — meaning a ring shot straight-on has the stone sharp and the band blurred, or vice versa. Focus stacking solves this by shooting a sequence of frames with focus stepped across the depth of the piece, then merging them in post. The lighting must be identical across every frame in the stack, which is why strobes with recycling times under a second and locked-down power settings matter here more than anywhere else. This one technique alone is often what makes a listing image look genuinely premium.
Technique 10 — Two-Light Setup for Small Studios
If space and budget are tight, a two-light setup will still get you 80% of the way. One key softbox at 45 degrees, one white bounce card on the opposite side acting as fill, a black flag behind the camera to prevent front reflections, and a small piece of black acrylic as the shooting surface. This is the setup Prince still uses for quick catalogue overflows and it is entirely capable of Amazon-approved primary images. Do not let equipment envy delay you — start where you are, then upgrade as revenue justifies it.
Jewellery Photography Lighting Setup — Step-by-Step Studio Guide
The following five-step process is how every jewellery shoot at Ckstudio begins, whether it’s a single ₹50,000 solitaire ring or a 300-piece silver catalogue for a Meesho seller. Following this order — background, key, fill, control, camera — prevents the messy backtracking that costs most beginners hours. If you want to see this in a working environment, the behind-the-scenes walkthrough of a Ckstudio shoot shows the same process in action across other categories, and the complete jewellery photography checklist covers the pre-shoot prep this section assumes.
Step 1 — Choose the Right Background
Start with the background because everything else responds to it. For Amazon, that’s pure white (RGB 255,255,255). For editorial, a subtle gradient or dark textured surface. For lifestyle, a natural material — linen, wood, marble — that complements the piece without competing. The wrong background costs you either compliance or storytelling.
Step 2 — Position the Key Light
Place your key softbox at 45 degrees to the piece, at roughly the same height, between 60cm and 90cm distance depending on modifier size. Fire a test frame with only the key on — this is your foundation image. If the metal already looks close to correct at this stage, everything downstream will be simpler.
Step 3 — Add Fill Light and Bounce Cards
Add a fill softbox on the opposite side at ¼ to ½ the key’s power, or use a white bounce card if you only have two lights. The fill should open shadows without eliminating them — jewellery needs some shadow to look three-dimensional. Test frame again.
Step 4 — Manage Reflections with Flags and Blockers
Position black flag cards to block ambient reflection from anything you don’t want recorded on the metal. For gold pieces, this is where 40% of the final result is decided. Look through the viewfinder and physically move flags until unwanted highlights disappear.
Step 5 — Fine-Tune Camera Settings
Set aperture between f/8 and f/11 for depth, ISO 100–200 for cleanness, and white balance matched to your light source (usually 5500K daylight for strobes, or the exact Kelvin reading of your LED). Turn on focus peaking, work off a tripod, and if the piece has depth, plan for focus stacking. Fire your first live frame and evaluate against the earlier test — if reflections, colour, and depth all read correctly, you’re ready.
| Feature | LED Continuous | Studio Strobe |
|---|---|---|
| Power Output | Lower, steady | Higher, burst |
| Color Accuracy | Good (CRI 95+ models) | Excellent, consistent |
| Heat Generation | Low | Very low (flash only) |
| Learning Curve | Beginner-friendly | Intermediate to advanced |
| Cost Range | ₹8,000 – ₹1,50,000 | ₹18,000 – ₹5,00,000 |
| Best For | Gold, silver, video, learners | Diamonds, editorial, high volume |
| Modifier Compatibility | Bowens/S-mount common | Bowens, Elinchrom, Profoto |
Common Jewellery Photography Lighting Mistakes to Avoid
Every mistake below has cost a seller a rejected listing, a return, or a re-shoot. Most are preventable in seconds if you know what to check for.
Overexposing Metallic Surfaces
Metal is the easiest thing in a scene to blow out. Once you clip highlights, you cannot recover the texture — no amount of post-production brings back facet definition or engraved detail. Shoot slightly underexposed and lift in post; never chase brightness at the camera.
Ignoring Color Temperature Mismatches
Mixing daylight window light with tungsten room lighting, or using a strobe alongside a fluorescent bulb, produces colour casts that no white balance slider can fully fix. Close curtains, kill overheads, work in a controlled environment.
Using Only One Light Source
One light gives you either detail or drama, rarely both. Jewellery needs at least two — even if the second is a bounce card. This is the single most common issue in beginner ecommerce jewellery photography.
Skipping Post-Production Consistency
A 50-piece catalogue where the whites drift, the golds shift warmer and cooler, and the shadows land at different densities looks unprofessional even when each individual image is technically correct. Batch consistency in post is as important as lighting consistency during capture.
Jewellery Photography Lighting for Ecommerce Marketplaces (India)
India’s marketplaces each carry their own visual rulebook. Understanding the lighting requirement embedded in these rules is what keeps listings live, ranked, and converting. Ckstudio ships every deliverable pre-configured for the target platform’s spec — because a technically beautiful image that fails Amazon moderation is a technically beautiful failure.
Amazon Jewellery Photography Lighting Requirements
Amazon’s main image spec demands pure white background, product filling at least 85% of the frame, no props, no text, no reflection artefacts, and accurate colour. Achieving pure white without blowing out the metal requires careful key-fill balance and a background lit half a stop brighter than the piece. Amazon’s A+ content and secondary images allow more creative freedom — lifestyle shots, scale references, ingredient shots.
Flipkart & Myntra Product Image Standards
Flipkart’s jewellery guidelines mirror Amazon on the primary but relax on secondary shots. Myntra runs an editorial standard — model shots often outperform product-only shots in jewellery, so your studio lighting needs to serve both product-alone and model-with-product setups. Myntra’s colour accuracy standard is strict; a 22k gold piece must look 22k on screen, not brassy.
Meesho & D2C Brand Photography Lighting
Meesho leans toward high-volume, high-turnover jewellery — imitation, silver, fashion pieces. Speed and consistency matter more than editorial polish. This is where light tents and standardised setups earn their keep. D2C brands going direct through Shopify or Instagram lean the other way — they want editorial imagery that builds brand equity. Ckstudio’s Ajio and Meesho seller workflows draw from separate lighting recipes than the boutique D2C shoots, though both live under the same roof.
Understanding the Full Topic: Who This Guide Is For
The audience for jewellery photography lighting is wider than most people realise. Photographers at intermediate to advanced levels come here to refine specific techniques. Jewellery brand owners — D2C founders, ecommerce sellers, luxury boutique operators — arrive researching whether to build in-house capability or hire out. Studio owners scaling into the jewellery niche need to understand modifier economics and equipment ROI. Ecommerce managers running Amazon, Flipkart, Myntra, and Ajio catalogues are usually looking for compliance-safe setups. Content creators and Instagram-first jewellery brands in Delhi NCR want editorial polish at manageable cost. Diamond and gold retailers evaluating studio partners want to understand what quality actually looks like.
Their pain points overlap. Reflective surfaces on gold and silver create harsh hot spots. Diamonds appear dull or fail to show fire. Metallic reflections show camera and photographer in the piece. Uneven lighting throws shadows across intricate design work. Balancing exposure between metal and gemstones — where the metal is bright and the stone dark, or vice versa — is genuinely hard. Modifier selection confuses beginners. White balance drifts when yellow gold meets warm lighting. Budgets are always tight for professional equipment. And marketplace rejections due to poor lighting are a weekly problem for growing sellers.
Their goals converge on the same needs: learn the setups step-by-step, understand modifiers deeply, achieve marketplace-ready output, reduce post-production time, master reflection and material rendering, and — where DIY doesn’t work — find a professional studio like Ckstudio that can execute at scale. This guide is written to serve every one of those users at once, which is why it doesn’t shy from the technical specifics that a five-minute overview article skips. If you’re deciding between building capability and outsourcing, Prince’s complete jewellery photography guide for Indian ecommerce covers the commercial side of that decision in depth.
Ckstudio Professional Jewellery Photography Services in Delhi NCR
Ckstudio operates out of Delhi NCR as a specialist product and fashion photography studio serving marketplace sellers, D2C brands, export houses, and boutique jewellers across India. For jewellery specifically, we run a dedicated shooting bay with fixed lighting geometry, colour-managed post-production, and marketplace-formatted delivery. Every piece is shot with the same technical rigour a boutique diamond house would demand — but at ecommerce-friendly pricing and turnaround. Prince personally leads jewellery shoots that involve high-value pieces, editorial work, or first-time client onboarding.
Delhi NCR is home to several of India’s most concentrated jewellery clusters — Karol Bagh, Chandni Chowk, Zaveri Bazar’s northern satellites, Sarojini, and the growing D2C brand hubs across Gurgaon and Noida. Ckstudio serves clients from all of these locations, either through in-studio shoots at our Delhi facility or on-location for retail displays and campaign shoots. Related deep dives on Ckstudio’s approach are covered across the Indian brands product photography guide, the ecommerce sales conversion tips article, and the studio selection guide for Delhi NCR.
Our Studio Lighting Setup & Equipment
The Ckstudio jewellery bay runs four Godox SK 400II heads and two Elinchrom FRX 400 units with four strip softboxes and two octabox modifiers, complemented by a beauty dish for fashion and model-plus-jewellery hybrid shoots. Cameras are Canon R10 and Sony A7R V. Lens work leans on 100mm macro for close product work, 50mm for wider ecommerce compositions, and 24-70mm for on-model and lifestyle jewellery frames. Every piece gets shot with a tethered laptop for immediate client review.
Pricing Plans & Packages
Basic
- Up to 5 pieces
- White background
- Single-light setup
- 2 angles per product
- 48-hour delivery
Standard
- Up to 15 pieces
- White + lifestyle
- Three-point lighting
- 4 angles per product
- Amazon/Flipkart formats
Premium
- Up to 30 pieces
- Full studio softbox + polarized
- 6+ angles per product
- Editorial retouching
- 360° + short video clip
Enterprise
- Unlimited pieces
- Dedicated studio day
- Full creative direction
- Bulk CSV/API delivery
- Project manager assigned
“After a decade of shooting jewellery, I’ve stopped chasing gear and started chasing geometry. The photographer who understands where the light needs to hit the stone will out-shoot the photographer with the more expensive kit, every time.” — Prince, Founder, Ckstudio
Which Setup for Which Jewellery Type
| Jewellery Type | Recommended Technique | Key Light | Fill Light | Special Consideration |
|---|---|---|---|---|
| Diamond Rings | Multi-source hard light | Small directional | Bounce card | Black backdrop for fire |
| Gold Necklaces | Three-point + polarized | 60cm softbox | 90cm softbox | WB 5200–5500K |
| Silver Earrings | Light tent | LED panel | LED panel | Cool WB bias |
| Platinum Bands | Softbox + rim light | Octabox | Silver reflector | Restrained tone |
| Pearl Sets | Large soft diffusion | 120cm strip | White bounce | Avoid hotspots |
| Gemstone Pendants | Directional + backlight | Grid softbox | Bounce + rim | Focus stack |
| Bridal Sets | Editorial multi-light | Beauty dish | Strip softbox | Model + product hybrid |
Frequently Asked Questions About Jewellery Photography Lighting
What is the best lighting for jewellery photography?
How do you photograph diamond jewellery to show sparkle?
LED or strobe lighting — which is better for jewellery photography?
How do you eliminate reflections in gold jewellery photography?
How much does professional jewellery photography lighting setup cost in India?
Final Thoughts on Jewellery Photography Lighting
Every technique in this guide reduces to one principle — light is not something you point at jewellery, it’s something you shape around jewellery. A photographer who spends ten minutes moving a black flag learns more than one who spends ten hours reading about lights. The setups here are the working recipes Ckstudio uses across thousands of pieces a year, but they only become yours when you stand at the shooting table, watch the metal change as you move a modifier by five centimetres, and start to see light the way jewellery sees it. If you’d rather skip the learning curve for a live catalogue, Ckstudio‘s team is one call away — reach Prince on +91-8700258773, WhatsApp +91-8700258773, or email [email protected].
Continue Reading
Explore More on Jewellery Photography Lighting
Browse related searches, questions, and voice queries around this topic.
People Also Search For
Long-Tail Related Searches
People Asking Question
Related Voice Searches
External authority references: Amazon Seller Central India · Flipkart Seller Hub